The best and easy recipes

Check out the most popular, tasteful and easy food and drink recipes!

Beautiful and interest hair styles

Find here the most interesting and beautiful hair style

Great make-ups!

Take a look on the various amazing and beautiful make-ups!

Mostrando postagens com marcador vanilla. Mostrar todas as postagens

sexta-feira, 27 de setembro de 2013

DIY Sea Salt Body Scrub

This gritty DIY salt scrub turns your shower into a blissful beauty spa and leaves your skin clean and rejuvenated.


Put coarse sea salt into a bowl.


Stir baby oil into the salt until it thoroughly coats the salt grains.


Stir in almond or vanilla extract to add a scent to your DIY Salt Scrub.


  • 1/2 cup coarse sea salt 
  • 1/4 cup baby oil 
  • 1/2 tsp. almond or vanilla extract 

Instructions

  1. In a small bowl, stir the sea salt and oil together until the oil thoroughly coats the salt. Add the extract and stir it in completely.
  2. Hop in the shower. When skin is thoroughly wet, apply with your hands, a washcloth, or a puff scrubber. Massage in and be sure to rinse off thoroughly.
TIP
Be good to yourself and the environment by taking a Navy shower (it was developed on ships, where fresh water is at a premium). This simple technique can cut the amount of water you use for a shower by up to 80 percent!
  1. Turn on the shower.
  2. Wet your body and hair.
  3. Turn the water off.
  4. Soap up your body, then shampoo your hair. (Save the shampoo for last so it doesn’t get in your eyes.)
  5. Turn the water back on and rinse off.
DIY Salt Scrub Photography by Lori Foy.

Strawberry Pizza


When you mix up the crust it will seem a bit crumbly but just use your hands and form it into a ball.  It will come together nicely.


Just roll it out with a rolling pin on an ungreased cookie sheet or a baking stone will work too.


Bake for about 12-15 minutes or until lightly golden brown.
While it is baking and cooling mix up your cream cheese mixture and your strawberry mixture.  Use 1 cup of smashed strawberries.  I do mine in the food processor.
Cook the strawberries with sugar and cornstarch until it thickens and is glossy – will take about 5-10 minutes.  Cool.
After the crust is cool spread with cream cheese mixture you mixed up.


Add strawberry mixture and sliced strawberries.


The crust ends up being a bit fragile so it can be a bit messy to eat.  I just use my pizza cutter to slice it up.

Ingredients
    Crust:
  • 1 C flour
  • 1/4 C powdered sugar
  • 1/2 C butter
  • Filling:
  • 1 (8 oz.) cream cheese, room temperature
  • 1/2 tsp. vanilla extract
  • 1/2 C granulated sugar
  • 1/4 tsp. freshly squeezed lemon juice
  • Topping;
  • 1 C fresh strawberries, mashed
  • 4 Tbsp. granulated sugar
  • 1 Tbsp. cornstarch
  • 8 - 10 strawberries sliced.
Instructions
    Crust:
  • In a medium bowl, combine flour, sugar and butter.
  • Form into a ball with hands and press into a 14 inch ungreased pizza pan (I used my Pampered Chef pizza stone)
  • Bake at 325 degrees for 15 minutes. Cool.
  • Filling:
  • In a medium bowl, combine cream cheese, vanilla, sugar and lemon juice.
  • Spread on cooled crust.
  • Topping:
  • In a saucepan over medium heat, combine strawberries, sugar and cornstarch.
  • Simmer until thick and glossy. Cool.
  • Spread on top of cream cheese filling.
  • Cut fresh strawberries crosswise to make rounds that resemble pepperoni, place on pizza and serve

domingo, 30 de junho de 2013

Orange Dream Creamsicle Smoothie


Summary
A low-calorie, healthy smoothie that tastes just like a creamsicle. A perfect post-workout thirst quencher or mid-afternoon snack.

Ingredients

  • 1 navel orange, peeled
  • 1/4 cup fat-free half-and-half or fat-free yogurt
  • 2 tablespoons frozen orange juice concentrate
  • 1/4 teaspoon vanilla extract
  • 4 ice cubes

Instructions

  1. In a blender, combine the orange, half-and-half or yogurt, orange juice concentrate, vanilla, and ice cubes. Process until smooth.
Preparation time: 5 minute(s)
Number of servings (yield): 1

terça-feira, 18 de junho de 2013

Mini German Pancakes


1 cup milk
6 eggs
1 cup flour
1/2 tsp. salt
1 tsp. vanilla
1 tsp. orange zest (optional)
1/4 cup butter, melted
  1. Preheat oven to 400 degrees F. Blend first six ingredients (milk thru orange zest) in a blender.  Be careful to see that any flour clumps get well-blended.
  2. Blend in butter a little at a time in order to temper the eggs.
  3. Grease muffin tins well and distribute batter evenly between 24 tins (I did more like 18. Gimme Some Oven’s tins were slightly less than half-full.  I used a 1/4 cup measuring cup and filled it almost full.) Bake for 15 minutes, or until puffy and golden on top.
  4. Served with your favorite toppings.  (Mine was a dusting of powdered sugar and triple berry sauce.  I have other suggestions up top)


domingo, 16 de junho de 2013

Chocolate and Peanut Butter Parfaits


For the chocolate base:
1 cup milk, 2% or higher
1/3 cup sugar
2 tablespoons Dutch-processed cocoa
1 tablespoon cornstarch
1 teaspoon vanilla
1 egg yolk
1 tablespoon butter
1 ounce bittersweet chocolate, chopped
For the peanut butter base:
1 cups milk, 2% or higher
1/4 cup sugar
1 tablespoon cornstarch
1 egg yolk
3 tablespoons peanut butter
1 teaspoons vanilla
1 tablespoons butter
For the whipped cream:
1 teaspoon powdered gelatin
2 tablespoons cold water
1 pint (2 cups) heavy whipping cream
1/4 cup powdered sugar
2 teaspoons vanilla
Dark Chocolate and Peanut Butter Mousse Parfait Dark Chocolate and Peanut Butter Mousse ParfaitDark Chocolate and Peanut Butter Mousse Parfait
In a medium sauce pan combine the milk, sugar, cocoa powder, cornstarch, and egg yolk.  Whisk until very well incorporated then cook over medium heat, stirring constantly, until it begins to simmer and thicken.  Remove from the heat and add the vanilla, butter and chopped chocolate and stir until melted.  Pour through a strainer into a separate bowl and cover with plastic wrap.  Allow to cool to room temperature.
Dark Chocolate and Peanut Butter Mousse ParfaitDark Chocolate and Peanut Butter Mousse Parfait
Dark Chocolate and Peanut Butter Mousse Parfait
In a medium sauce pan combine the milk, sugar, peanut butter, cornstarch, and egg yolk.  Whisk until very well incorporated then cook over medium heat, stirring constantly, until it begins to simmer and thicken.  Remove from the heat and add the vanilla and butter, and stir until melted.  Pour through a strainer into a separate bowl and cover with plastic wrap.  Allow to cool to room temperature.
Dark Chocolate and Peanut Butter Mousse Parfait
Next, prepare the whipped cream.  Pour the gelatin into the cold water and allow to stand for five minutes, or until completely bloomed.  Heat for five seconds in the microwave, making sure it is melted, and cool to room temperature.  Pour the cold cream into the bowl of a stand mixer.  Add the powdered sugar and vanilla.  Whisk on medium low speed until the sugar is blended then increase the speed to medium high.  When the cream is softly whipped pour in the cooled gelatin.  Whip until the cream forms medium peaks.  Chill for thirty minutes, covered, in the refrigerator.
Dark Chocolate and Peanut Butter Mousse ParfaitDark Chocolate and Peanut Butter Mousse Parfait
Gently stir both the chocolate and peanut butter bases until smooth.  Add 1/3 of the whipped cream to each base and fold until the mixtures are uniform in color.
Dark Chocolate and Peanut Butter Mousse Parfait
Fill three piping bags with the peanut butter mousse, the chocolate mousse, and the whipped cream.  Pipe the mousse into your serving dishes/glasses in alternating layers, starting with chocolate and ending with whipped cream.  Chill the parfaits for at least two hours before serving. 


Source: http://www.evilshenanigans.com/2010/10/short-rib-sandwiches-sweet-potato-chips-chocolate-peanut-butter-parfaits-and-blood-orange-and-ginger-sparkler/

quarta-feira, 12 de junho de 2013

Refrigerator Bakery Brownies


Refrigerator Bakery Brownies


Refrigerator Bakery Brownies

These brownies are best enjoyed chilled, like their real-life bakery cousins. Seriously though, who can wait for brownies to cool before eating one? Enjoy one gooey and delicious right after frosting, then tuck them away in the refrigerator for the next day. The frosting will firm up and the flavors will develop.
Refrigerator Bakery Brownies
Here you can see a brownie freshly frosted. It is still dense but the frosting is soft and melty. Totally edible. Of course you don’t have to frost the brownies at all, but may I ask what’s wrong with you?
Many people use instant coffee or espresso to bump up the chocolate flavor in desserts. If you are one such person, add a pinch of either to the frosting when adding the vanilla. I for one don’t like the taste of coffee (even if you say it can’t be tasted in desserts – I can taste it) and would rather not add the caffeine jolt to an already loaded chocolate brownie.
Refrigerator Bakery Brownies

Ingredients
For the brownies:
1/4 cup all-purpose flour
1 teaspoon baking powder
1/2 teaspoon salt
1/2 cup (1 stick) butter
3 ounces unsweetened chocolate
1/2 cup firmly packed light brown sugar
1/2 cup granulated sugar
2 large eggs
1 large egg yolk
1 teaspoon pure vanilla extract
1/2 cup semisweet chocolate chips
For the frosting:
1 cup semisweet chocolate chips
4 tablespoons butter
1 teaspoon pure vanilla extract
1 pinch salt
1/2 cup powdered sugar
1-2 tablespoons milk
Preheat the oven to 350ÂşF and place a rack in the upper third of the oven. Grease and flour an 8 inch square baking pan and set aside.
In a medium bowl, whisk together flour, baking powder, and salt. Set aside.
In a medium saucepan, bring 2 inches of water to a boil. In a medium, heatproof bowl, add butter and unsweetened chocolate. Place the bowl ore, but not touching, the simmering water and allow to melt, stirring occasionally to incorporate. Once the butter and chocolate have melted, remove the bowl from the simmering pot and whisk in the brown and granulated sugar. Whisk in the egg, yolk, and vanilla. Add the flour mixture all at once and fold into the chocolate mixture with a spatula until well incorporated. Fold in the chocolate chips.
Pour the batter into the prepared pan and bake 25-30 minutes or until a toothpick inserted in the center comes out with moist crumbs clinging. Remove from the oven and allow to cool completely before frosting.
To prepare the frosting, place chocolate chips and butter in a microwave safe bowl and microwave in 20 second increments, stirring in between, until melted. Whisk in the vanilla and salt, then stir in the powdered sugar. Add the milk a few drops at a time, whisking briskly, until the frosting is smooth and shiny. Spread immediately on the cooled brownies. Refrigerate until the frosting is set and you are ready to serve. Brownies will keep wrapped tightly in plastic wrap for up to 5 days.

Grilled angel food cake


Dietitian's tip:
Angel food cake is a low-fat, airy dessert that is the perfect finish to a summer meal. If you're using the grill for dinner, grill the angel food cake after you finish your meal. Or, if you prefer, broil the angel food cake until it browns. 
By Mayo Clinic staff
Serves 6

Ingredients

    1 1/2 cup strawberries, chopped
    3/4 cup chopped rhubarb
    1/2 cup sugar
    6 tablespoons water
    1 3/4 teaspoons vanilla
    1/8 teaspoon cinnamon
    1 prepared angel food cake, cut into 6 pieces
    3/4 cup reduced-fat whipped topping

Directions

Prepare a hot fire in a charcoal grill or heat a gas grill or broiler. Away from the heat source, lightly coat the grill rack or broiler pan with cooking spray. Position the cooking rack 4 to 6 inches from the heat source.
To make the sauce, in a saucepan, combine the strawberries, rhubarb, sugar, water, vanilla and cinnamon. Cook on medium heat until the mixture just starts to boil, about 5 minutes. Remove the saucepan from the heat and set aside.
Place the angel food cake toward the edge of the grill rack where there is less heat or on the broiler pan. Grill or broil until each side turns brown, about 1 to 3 minutes.
Place the angel food cake on individual serving plates. Top each piece with 1/4 cup of the strawberry-rhubarb sauce and 2 tablespoons of the whipped topping. Serve immediately.

terça-feira, 11 de junho de 2013

Blueberry Collada Smoothie


1/2 cup frozen blueberries
2 ice cubes
1 1/4 cups water
2 Scoops Isagenix Vanilla Shake (or your vanilla protein of choice)
1 tsp PB2
1/2 tsp Coconut extract
Place all ingredients in a blender and whirl it together until smooth and creamy.
You can choose to garnish it with some coconut flakes or additional blueberries, although the blueberries do sink right to the bottom.
Delicious and totally refreshing, leaving my fingers with the faintest smell of coconut extract on them, which makes getting through the 9-5 that much easier.

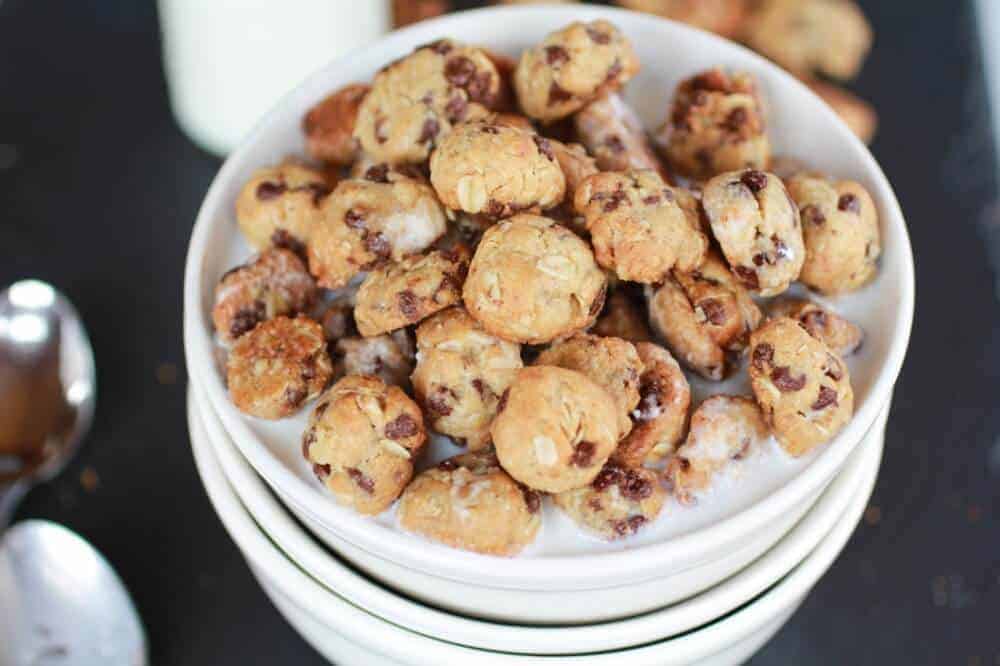
Oatmeal Chocolate Chip Cookie Cereal


Cookie Cereal
Prep Time: 10 minutes
Cook Time: 5 minutes
Total Time: 30 minutes
Yield: 5 cups of cookie cereal
Ingredients
  • 1/2 cup coconut oil (you can swap softened butter if you'd prefer)
  • 1/8 cup sugar
  • 1/4 cup brown sugar
  • 1 teaspoon vanilla
  • 1 egg
  • 1 1/4 cups white whole wheat flour or whole wheat pastry flour
  • 3/4 cup old fashion oatmeal
  • 1/4 teaspoon salt
  • 1/2 teaspoon baking soda
  • 1/2 - 3/4 cup mini chocolate chips
Instructions
  1. Combine the whole wheat flour, baking soda and salt in small bowl. Beat the coconut oil, granulated sugar, brown sugar and vanilla extract in a large mixer bowl until creamy, about 3 to 5 minutes. Add the egg and beat well. Gradually beat in the flour mixture. Stir in the mini chocolate chips. Divide the dough in half and turn each dough out onto a large piece of plastic wrap or wax paper and form a very long and thin log with it, about 2 feet in length and about 1 inch in diameter. Seal up the bundle, roll it back and forth a couple times to smooth it out so one side isn't flat from resting on the counter, and place it in the freezer to chill for about 15-20 minutes. You just need the dough to firm up a bit so it is easier to roll into a bunch of little balls.
  2. Preheat the oven to 350 degrees F. Line two baking sheets with parchment paper or silpats.
  3. Remove the logs and using a sharp knife slice 1/2 inch slices of dough. If you prefer flatten cookies you can simply place the rounds of dough on the prepared baking sheets. If you want a rounder cookie (this is what I did for most of mine) roll the sliced cookie dough between your hands to make a small ball and place on the the prepared baking sheet.
  4. Bake for 5 to 6 minutes. Allow to cool completely before storing in an airtight container. Seve over milk, yogurt or eat by the handful!
Oatmeal Chocolate Chip Cookie Cereal | halfbakedharvest.com
Really, it brings out the inner kid inside you – so fun!